Thinking about boosting your home security? Learning how to install security camera systems is easily one of the most rewarding DIY skills you can pick up. Whether you want to monitor your front porch, keep an eye on the backyard, or watch over the driveway, a properly set up system brings an undeniable sense of safety.
In this comprehensive security camera installation guide, we will break down the entire process—from picking the perfect hardware to getting your live feed up and running—into clear, stress-free steps.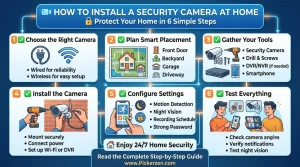
Why You Should Install a Security Camera at Home
Before we jump into the how to install CCTV camera step by step process, let’s look at why having one is a total game-changer for your peace of mind:
- Instantly Deters Intruders: Just the visible presence of a camera is often enough to make burglars think twice and move on.
- Solid Video Evidence: If vandalism or theft does occur, you have high-quality footage ready for law enforcement and insurance claims.
- Keep Tabs on Your Loved Ones: Check in on your kids coming home from school, older family members, or mischievous pets while you are at work.
- Real-Time Smartphone Alerts: Get instant notifications the second suspicious activity is detected on your property.
Step 1: Choose the Right Type of Security Camera
When figuring out how to set up security cameras, your first major decision is choosing between the two primary formats available on the market:
Wired Security Cameras
If your priority is a bulletproof, uninterrupted connection, you will want to how to install wired security camera systems. These units rely on physical cables (usually Ethernet/RJ45 or coaxial) to transmit data. While running wires takes a bit of extra sweat equity, the payoff is unparalleled reliability that is completely independent of your Wi-Fi strength.
- Best for: Large properties, detached garages, and permanent outdoor setups.
Wireless Security Cameras
If you want a hassle-free project, learning how to install wireless security camera systems is incredibly simple. These cameras connect straight to your home Wi-Fi network and often run on batteries or a simple power plug. They are the go-to choice for renters or anyone who shudders at the thought of drilling through multiple walls to fish cables.
- Best for: Apartments, indoor spaces, quick setups, or temporary living situations.
Step 2: Plan Your Camera Placement
Smart placement is everything when figuring out how to install a security camera system. To get the most out of your view, prioritize these high-traffic zones:
- The Front Door: Statistically, over 30% of break-ins happen right through the main entrance. Put a camera here first.
- Back/Side Doors & Garages: These are common, shielded secondary entry points that intruders love to exploit.
- Driveways & Walkways: Perfect for keeping an eye on your vehicles and catching approaching visitors early.
- Ideal Mounting Height: Mount your cameras 8 to 10 feet off the ground. This keeps them high enough to prevent tampering or vandalism, yet low enough to capture clear, identifiable facial details.
A Quick Privacy Reminder: Always angle your cameras to respect your neighbors’ boundaries. Avoid pointing them directly at someone else’s windows, backyard, or strictly public spaces.
Step 3: Gather Your Tools and Equipment
Before diving into the hardware, make sure you have these essentials within arm’s reach:
- Security cameras (wired or wireless)
- DVR/NVR recorder (essential for wired systems)
- Power drill and appropriate drill bits
- Screws and wall anchors (usually included in the camera box)
- Cable clips or conduits (to keep wires neat)
- A sturdy ladder
- A smartphone or laptop for final configuration
Step 4: The Actual Installation Process
Let’s get into the core practical section of our security camera installation guide. Follow the path that matches your camera type:
For Wired Systems:
- Mount the Bracket: Hold the camera mount against the wall, mark your drill points, and drill your pilot holes. Insert your wall anchors and secure the bracket tightly to the surface.
- Run the Cables: This is the part that requires patience. Route your cables from the camera location, through ceilings, attics, or along baseboards back to your central DVR/NVR unit. Use cable clips to keep everything flush and tidy.
- Hook Up to the DVR/NVR: Plug the camera cable into the back of your recorder. Each camera will correspond to a numbered channel on your system.
- Connect to a Monitor and Router: Link your DVR/NVR to a TV or monitor using an HDMI cable to view your hub. To view your cameras outside your home, run an Ethernet cable from the recorder straight into your internet router.
- Power Up: Turn the system on. Most modern wired setups use PoE (Power over Ethernet), meaning a single network cable delivers both electricity to the camera and video back to the recorder.
For Wireless Systems:
Setting up a wireless option is incredibly streamlined:
- Power the Camera: Insert the batteries or plug the camera into a nearby power outlet to turn it on.
- Get the Companion App: Download the manufacturer’s official app (such as Reolink, Ezviz, or Wyze) onto your smartphone.
- Sync to Your Wi-Fi: Open the app, register an account, and follow the simple on-screen prompts. This usually involves using your camera’s lens to scan a QR code displayed on your phone screen to pair it to your home Wi-Fi.
- Mount the Unit: Take the paired camera to your desired location. Before drilling, check your phone to ensure the Wi-Fi signal is strong at that specific spot. If it looks good, screw the mount into place.
- Adjust the Angle: Look at the live smartphone feed while physically adjusting the camera to eliminate blind spots, then lock the camera position tight.
Step 5: Configure and Customize Your Settings
Your CCTV camera installation instructions aren’t completely finished once the hardware is up. Open your app or monitor to optimize these crucial software settings:
- Customize Motion Zones: Highlight only your active yard or walkway. Masking out swaying trees or a busy public sidewalk avoids flooding you with notification with constant false notifications.
- Turn on Night Vision: Ensure your infrared (IR) or color night vision is set to switch on automatically as darkness falls.
- Establish a Recording Schedule: Choose between energy-saving motion-triggered recording or 24/7 continuous loop recording if you have plenty of storage.
- Change Default Passwords: Do not skip this step! To prevent your system from being vulnerable to online hackers, immediately change the factory-set admin password to a strong, unique phrase.
Step 6: Test Your Work
Before packing away your tools, give your new system a thorough test drive:
- Walk past each camera to check for any blind spots or lag in the feed.
- Test the night vision by shutting off the lights or checking the outdoor feeds after sunset.
- Make sure push alerts are successfully hitting your smartphone lock screen when motion is detected.
Common Installation Pitfalls
- Mounting Too High: Placing a camera on a second-story roof might give you a wide view, but you will only capture the tops of people’s heads instead of recognizable faces.
- Ignoring Wi-Fi Limits: Installing a wireless camera too far from your router results in choppy, pixelated video or frequent disconnections.
- Leaving Wires Exposed: Exposed wires on a wired camera look messy and can easily be snipped by an intruder. Always conceal them or use protective conduits.
Final Thoughts
Protecting your home doesn’t have to mean paying hundreds of dollars for a professional installer. Whether you opt for a heavy-duty wired network or a flexible, smart wireless setup, taking it step by step ensures a seamless deployment. Take your time with the positioning, secure your network, and enjoy the confidence of knowing your home is fully monitored.
Which style are you thinking of setting up for your home—the reliable wired system or the quick-and-easy wireless route?