Oil stains on car seats are just plain frustrating. A burger wrapper slips, sunscreen smears, you bump something under the hood—next thing, you’ve got a greasy blotch that refuses to come out. If you’re wondering how to remove oil stains without damaging your car seats, you’re not alone. Water won’t help, and rubbing only makes it uglier. Cleaning up oil isn’t like dabbing up a coffee spill—it slips right into the fabric and won’t let go.
But here’s some good news: most oil stains aren’t a lost cause. You really can erase them without paying for a pro detail. All you need is a couple basic supplies and a little time.
Let’s break it down so you’ll know how to get your seats clean again.
Why Oil Stains removal Are So Stubborn?
Oil works its way deep into car seats. Instead of sitting on top where you can wipe it up, it sinks in, grabs onto every fiber, and attracts dirt as it spreads out. Hot car? Forget it. The heat only draws it further in and bakes it there. The longer you wait, the deeper it gets, making it harder to remove oil stains later.
Your best shot? Treat it right away and don’t let it set if you want to effectively remove oil stains before they become permanent.
How Does Oil Get In Your Car, Anyway?
Honestly, it’s almost impossible to keep oil out. Maybe you picked up takeout. Or you just got out of the gym and your clothes still have lotion or sweat. There’s always someone with greasy fingers or hair product sliding into the seat. Sometimes it’s engine oil—or just your lotion-laden hand. It all leaves marks.
But don’t stress. The right treatment can remove oil stains from most car seats, no matter where they came from. With a few simple cleaning supplies and the right technique, you can tackle even stubborn grease spots and restore your upholstery.
What You’ll Need
Grab these before you start:
– Paper towels
– Vacuum cleaner
– A couple microfiber cloths
– A soft brush (an old toothbrush is fine)
– Baking soda or cornstarch
– Dish soap
– Warm water
– Spray bottle (if you have one)
– Upholstery cleaner
– White vinegar (optional)
If you have a wet/dry vacuum or steam cleaner, even better—but not required.
Step 1: Act Fast on Fresh Stains
If you spot a new oil mark, go for paper towels or a clean cloth and blot it gently. Blotting pulls up extra oil without spreading it around. Rubbing? Don’t even think about it. That’ll only grind the grease deeper.
Step 2: Hit the Area with Baking Soda or Cornstarch
Now, dump a layer of baking soda or cornstarch onto the spot. Let it sit 15–30 minutes. These powders suck up oil like magic. If it’s an older or bigger stain, let the powder rest a full hour.
Step 3: Vacuum Up the Mess
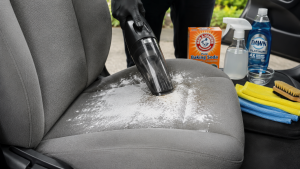
Once the powder has done its thing, vacuum it away. You’ll notice the spot’s already faded. If there’s still a shadow, repeat the powder step a second time before moving on.
Step 4: Make a Cleaning Mix
In a bowl, stir together two cups warm water and a couple drops of dish soap. Dish soap is killer on grease. If you want a little extra punch, add a splash of white vinegar. It’ll help kill any weird smells from the stain.
Step 5: Do a Quick Fabric Test
Always check your cleaner on a hidden patch of the seat first, just to make sure there’s no damage or color bleeding. Wait a couple minutes before starting on the stain.
Step 6: Spray the Stain—Don’t Soak
Mist the stain lightly. You want the spot damp—not dripping wet. Oversoaking can lead to mildew or funky smells, and waterlogged foam is no fun to dry out.
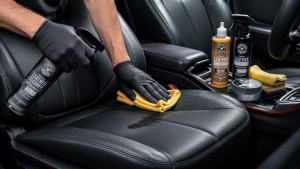
Step 7: Gentle Scrubbing
With your soft brush (or old toothbrush), gently scrub in circles. Patience is your friend—work more with a light touch, instead of going rough and risking damage. You may need two or three passes for stubborn spots. That’s normal.
Step 8: Blot With a Clean Cloth
Once you’re done scrubbing, blot again with a clean microfiber towel. Squeeze out as much moisture and soap as you can. You want the seat damp, not soaking wet.
Got an Old Oil Stain?
Older stains need more time and maybe a couple rounds. Leave the baking soda or cornstarch on overnight if you have to. Then repeat the steps: vacuum, clean, scrub, blot. If it doesn’t vanish after one session, try again the next day.
Using Store-Bought Upholstery Cleaner
If you want, grab a cleaner meant for auto upholstery—especially ones that work on grease. Never use anything with bleach or harsh chemicals or you’ll ruin your seat fabric.
Steam Cleaning
Steam cleaners are fantastic for stubborn stains. They break up oil, kill smells, and pull out gunk. Tackle the worst stains by pre-treating with baking soda first, then run the steamer over the area. Just don’t overdo the water.
What About Leather Seats?
Oil and leather is a tricky duo. Blot up all you can right away. Wipe gently with a leather cleaner on a soft cloth. Dry it off. And always, always use a leather conditioner afterward so it stays soft and won’t crack. Skip soaps, bleach, or too much water—they’ll age leather fast.
How Long Before the Seat’s Dry?
Depends how damp you got it, plus the weather. With good airflow—windows down, fans running, or the car’s AC on—most seats will dry out in two to six hours. Don’t let seats stay soggy overnight, or you’ll get mold.
How to Avoid Oil Stains
Prevention makes life easier. Here’s how:
– Put on some seat covers—especially if you have kids, pets, or transport anything dirty.
– Try not to eat greasy food in your car.
– Wipe up spills fast.
– Vacuum often so crumbs and dust can’t trap oil.
Don’t Make These Mistakes
Never rub the stain.
Don’t drown the seat with water.
Don’t blast it with harsh chemicals.
And don’t skip the powder—it’s your easiest way to pull out the oil before deep cleaning.
When’s It Time for a Professional?
If the stain’s massive, soaked into the foam, still there after all your efforts, or you have fancy upholstery, call in the pros. They’ve got tools and cleaners most of us just don’t own.
Bottom Line
Oil stains don’t have to ruin your seats. Take care of them right away, use simple stuff like baking soda and dish soap, and keep cleaning gentle. These easy methods can help you remove oil stains effectively and keep your car interior looking fresh. Stay on top of messes, and your car will look (and smell) good for years.