Fix KitchenAid Stand Mixer with confidence and ease! I still remember the first time I unpacked my KitchenAid mixer. The heft of it, the shiny finish, and that promise of effortless baking—it felt like a little kitchen companion was born. If you’re like me, you probably want your mixer to last decades while performing flawlessly. To achieve that, it helps to understand its history, model designations, and maintenance needs.
In this guide, I’ll walk you through:
- The history and evolution of KitchenAid mixers
- Key mixer types and models today
- How to decode your mixer’s model number
- Tips for maintaining and troubleshooting your mixer
- Color codes and attachments
- Practical advice for getting the most out of your mixer
1. A Brief History of KitchenAid Mixers
KitchenAid mixers were developed in 1919 by the Hobart Manufacturing Company. The original C-10 model was the first to carry the KitchenAid name, but it was engineer Herbert Johnston who invented the stand mixer. He spent about six years creating a smaller, home-friendly version, the H-5, launched in 1922.
In the 1930s, Egmont Arens redesigned the mixer to make it more affordable, resulting in the Model K, which has remained largely unchanged. Today, KitchenAid mixers have a cross-generational attachment compatibility, meaning some attachments fit mixers decades apart—a neat piece of engineering history that still matters to bakers like me.
Fun fact: Originally, these mixers came only in white. Today, you can pick from dozens of colors, from Empire Red to Almond Cream.
2. Understanding Mixer Types: Bowl-Lift vs Tilt-Head
When I first explored the current models, I realized the difference between bowl-lift and tilt-head mixers is crucial:
- Bowl-lift mixers: Ideal for heavy-duty baking since they handle larger bowls and more dough.
- Tilt-head mixers: Easier to access for everyday mixing tasks and smaller batches.
Most home bakers are familiar with the 4.5- and 5-quart Artisan series or the 6- and 7-quart Professional series. Knowing your mixer type helps in both attachment compatibility and maintenance routines.
3. Decoding KitchenAid Model Numbers
If you’ve ever stared at a model number like 5KSM70SHXEER0, you might have felt like you needed a PhD to understand it. Here’s the simple breakdown I use to make sense of it:
- A: Refurbished status (R for refurbished, blank for new)
- B: Voltage/frequency or country-specific variant (e.g., 5 = 220–240V/50Hz)
- CCCC: Mixer type (e.g., KSM = standard KitchenAid mixer, KP = Professional series)
- DD: Bowl size (e.g., 70 = 7-quart)
- EEEE: Internal features/attachments
- FF: Color code
- G: Model revision
- Example: 5KSM70SHXEER0
- 5: 220–240V/50Hz model
- KSM: Stand mixer
- 70: 7-quart bowl
- SHXE: Comes with stainless steel whisk, beater, dough hook, and coated dual flex edge beater
- ER: Empire Red color
- 0: Original design, no revisions
This breakdown helps me when sourcing replacement parts or choosing attachments for my mixer.
4. Mixer Attachments and Their Uses
KitchenAid mixers aren’t just for cake batter. I’ve learned to make the most of the attachments:
- Flat beater: Cakes, cookies, and frostings
- Dough hook: Bread and pizza dough
- Whisk: Egg whites, whipped cream
- Pasta roller/cutter: Homemade pasta sheets and noodles
- Meat grinder: Ground meat for burgers or sausages
Knowing which attachment suits your recipe makes the mixer more than a mixer—it becomes my kitchen workhorse.
5. Mixer Maintenance Tips
I treat my mixer like a member of the family, and here’s what I do to keep it performing well:
- Regular cleaning: Wipe the exterior and bowl after each use. Avoid immersing the motor base in water.
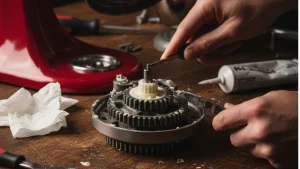
- Check attachments: Ensure gears and attachments are clean and not worn down.
- Lubrication: For older models, occasionally check if the planetary gear needs grease.
- Cord care: Avoid wrapping the cord tightly around the mixer to prevent fraying.
Pro tip: Using the right attachments and following the model number helps prevent unnecessary wear. 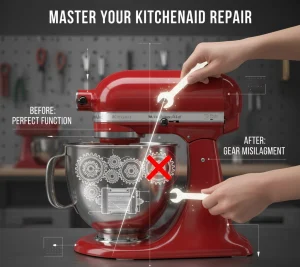
6. Color Codes and Choosing Your Mixer
KitchenAid mixers come in a variety of colors, but the color code isn’t just aesthetic—it helps with sourcing the correct parts. For instance:
- ER: Empire Red
- AC: Almond Cream
- PS: Pistachio
- WW: White
I always match my parts and accessories using the color code to avoid confusion, especially when ordering online or for refurbished mixers.
7. Troubleshooting Common Issues
Even the best mixers have hiccups. I’ve had my fair share, and here’s what I do:
- Mixer won’t start: Check the power cord, outlet, and ensure the bowl is correctly locked in.
- Unusual noises: Could be gears needing lubrication or a loose attachment.
- Overheating: Give the motor time to cool down; don’t push heavy dough continuously for long periods.
If the problem persists, referring to the KitchenAid parts list or contacting customer support with the model number usually resolves the issue quickly.
8. First-Time Mixer Setup
When I bought my first 7-quart Professional series, I followed a simple ritual:
- Run the mixer with water only for 3–5 minutes.
- Wash all attachments and the bowl thoroughly.
- Slowly add small test ingredients to ensure everything mixes evenly.
This little “initiation ceremony” protects the mixer and ensures long-term performance.
9. Additional Resources
For more details on KitchenAid attachments, blenders, and recipes, I’ve found these helpful:
- Stand mixer recommendations
- KitchenAid Blender guide
FAQ – Fix KitchenAid Stand Mixer
Q1: How do I fix my KitchenAid stand mixer if it won’t turn on?
A1: First, check that the mixer is properly plugged in and the outlet is working. Inspect the power cord for damage and ensure the speed control lever is correctly set. If it still won’t start, the internal wiring or motor might need inspection, which may require professional repair.
Q2: How can I identify my KitchenAid mixer model?
A2: You can find the model number on the bottom or back of your mixer. Decoding it helps determine the bowl size, attachments, voltage, and even color code. For example, “5KSM70SHXEER0” indicates a 7-quart mixer with stainless steel attachments in Empire Red.
Q3: What should I do if my mixer is making unusual noises?
A3: Unusual sounds often indicate a misaligned attachment, worn gears, or insufficient lubrication. Remove attachments and run the mixer empty. If noise persists, check the planetary gears or motor housing and consult the user manual or a repair professional.
Q4: How do I replace a KitchenAid mixer attachment?
A4: To replace attachments like the whisk, beater, or dough hook, ensure the mixer is turned off and unplugged. Twist or push the attachment into the hub until it clicks securely. Always refer to your mixer model’s compatibility to avoid damage.
Q5: Can I repair a refurbished KitchenAid stand mixer myself?
A5: Some minor issues like replacing a power cord or cleaning internal parts can be handled at home. However, more complex problems like motor failure or internal gear replacement should be done by a certified technician to maintain the refurb warranty.
Q6: How do I maintain my KitchenAid mixer for long-term use?
A6: Regularly clean the bowl, attachments, and exterior with mild soap and water. Avoid immersing the mixer in water. Check the planetary hub and gears occasionally and lubricate if needed. Proper storage and gentle use help prevent future breakdowns.
Conclusion
Fix KitchenAid Stand Mixer by understanding its history and decoding model numbers—it makes a huge difference in usability and longevity. I can honestly say that a well-maintained mixer is one of the best kitchen investments you can make. By learning its quirks, attachments, and codes, I can bake, mix, and create without worry.